How to create a GTK application using Python – Part 1
Hello everyone, this new article is a start of a new era on my blog as I will start writing few articles to share some tips or like on this one, a series of articles to build something together from scratch.
Writing a GUI(graphical user interface) application using Python isn't something new as you can already use a long list of libraries that allow you doing that. The difference from what are we going to do here is that we are going to use a list of GNOME libraries like GTK. Once the application is usable, we are going to add Meson as a build system and ship it on Flathub as a Flatpak. We will also talk a bit about application integration by following Freedesktop standards like shipping a metainfo file that describes the application, a desktop file, beautiful icons that follows GNOME design guidelines.
The most simple use case is a simple Todo list that should allow us to add new tasks to a list, remove them, mark them as done/undone, search on the tasks list, we will be adding features with time like using Handy (libhandy) to make the application mobile ready.
Requirements
We will need a few things in order to start hacking, the first thing is installing GNOME Builder. It's the IDE we will be using, it integrates a few useful features that we will be using like one click to build, run the application or the possibility to change the UI of our application easily as it integrates a part of Glade.
Install GNOME Builder
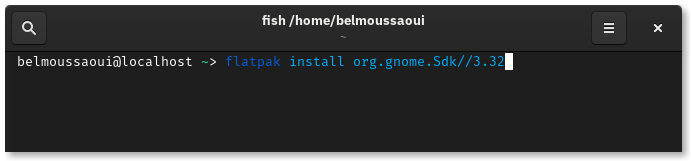
You won't be needing to install anything else. Every library that we might need like GTK, python-gobject, gobject-introspection, flatpak-builder, Meson are already shipped within Freedesktop/GNOME Runtime. We will be using the latest stable GNOME Runtime 3.32 which should be already installed on your system if you have installed Builder from Flathub (I do recommend you to do that instead of using the "normal" packaging formats). Otherwise, you can get that by typing in Terminal:
Getting started
Let's fire up GNOME Builder and create a new project. Once Builder's main window is shown, you can see a "Start a new project" button
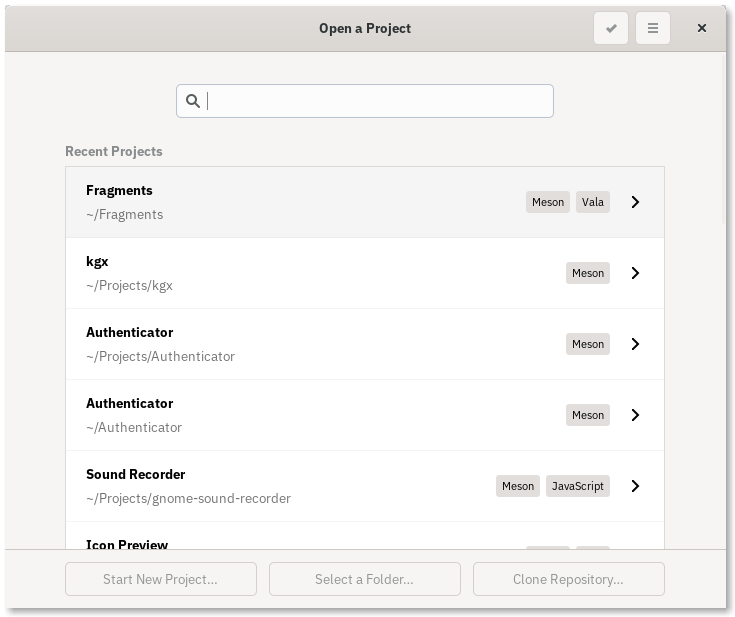
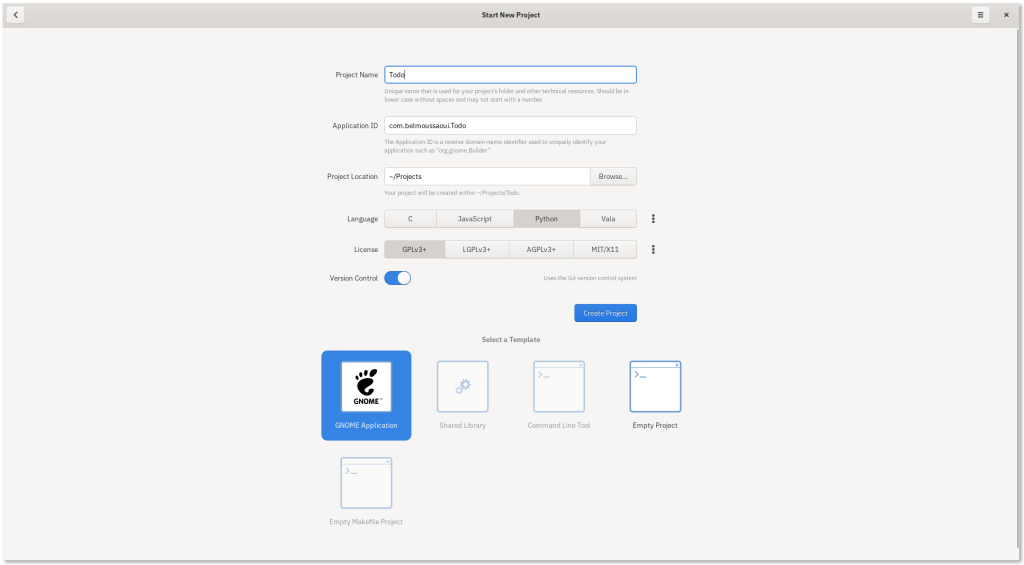
Once we have clicked on that, we get a list of different languages and projects types to choose from. We are going to select Python and GNOME Application as a template, we also need to choose a name for our project and an application ID. The Application ID should follow the reverse domain name standards, you can read more about that here on the GNOME Wiki
Before going through the list of files generated by Builder, we can check the result of what we have done so far by clicking on the run button or using CTRL + F5 shortcut.

Builder will use the Flatpak manifest generated automatically to build and run the application, you can see the build progress by clicking on "Build output" tab

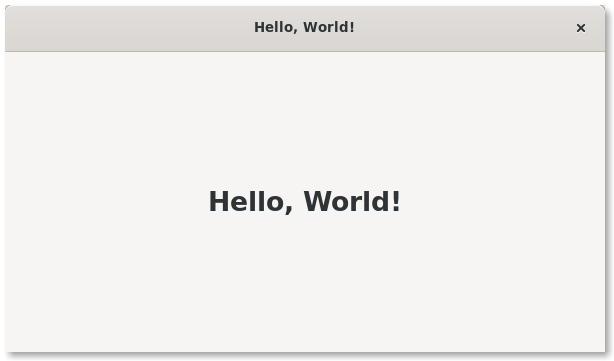
The build shouldn't take a long time (few seconds) and the current application should look like this
Now that we are sure that everything runs correctly, let's take a look at the list of files that were generated by Builder.
belmoussaoui@localhost ~/P/Todo > .
├── build-aux
│       └── meson
│           └── postinstall.py
├── com.belmoussaoui.Todo.json
├── COPYING
├── data
│       ├── com.belmoussaoui.Todo.appdata.xml.in
│       ├── com.belmoussaoui.Todo.desktop.in
│       ├── com.belmoussaoui.Todo.gschema.xml
│       └── meson.build
├── meson.build
├── po
│       ├── LINGUAS
│       ├── meson.build
│       └── POTFILES
└── src
    ├── __init__.py
    ├── main.py
    ├── meson.build
    ├── todo.gresource.xml
    ├── todo.in
    ├── window.py
    └── window.ui

5 directories, 18 files
What does interest us for now is the source code of the application, which is under src directory.
-
main.py: contains an Application which is a subclass ofGtk.Application, it allows us to set the application id that we have defined during the creation of the project and other attributes of an application. It also contains ado_activatefunction which is the function that will be executed once the application was activated. -
meson.build: contains where those python files should be installed and how the gresource file should be built and installed -
todo.gresource.xml: it's an XML file that defines the resources that our application needs like images, CSS files and UI files. -
todo.in: is the file that will be installed under$PREFIX/bin, which is the path on your system where all the binaries get installed. It's a Python file that has a.inextension which means it's a file that will be configured during the build as we need to pass to our application where we have installed our resources, where we can find the translations files for our application and other configurations we might need. -
window.py: is the main window widget, which is a subclass ofGtk.ApplicationWindow -
window.ui: is a file that defines which widgets our main window contains, it can be opened using Glade or GNOME Builder. You can edit the file either manually by writing the XML tags to define your widgets or just drag and drop your widgets if you open that file using Glade.
The UI of the main window
Now that we know where the widgets used in the main window are defined we can change those in order to fit our project. If we open the window.ui file in Builder, it opens the file in the design view, you can switch to the source view if you want to change the file manually.
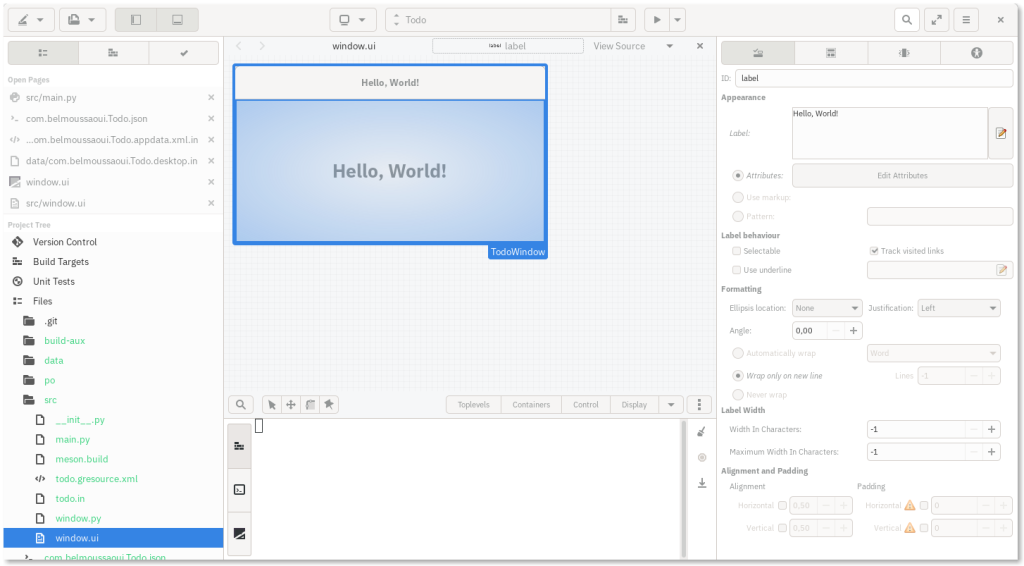
Builder allow you to easily figure out which GTK Widgets are used in our UI file.

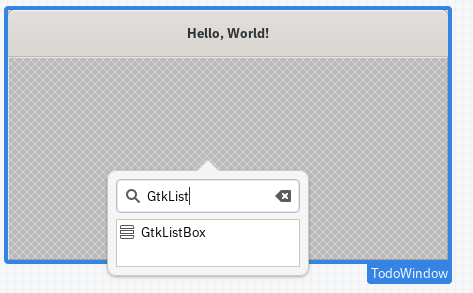
What we would like to do is to change the "Hello World" label to something else. The widget that fits our needs here is a ListBox which is basically a vertically oriented container that we can fill with any widget we want. You can right click on any widget and click on delete, so let's remove the label widget and add a GtkListBox instead.
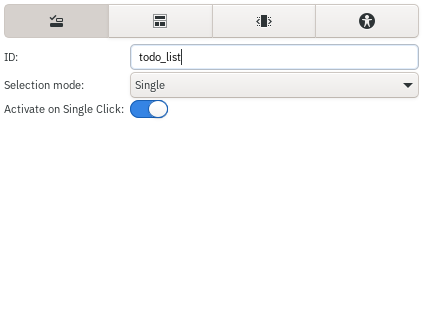
We can change the attributes of the selected widget from the right panel. The only thing we will be changing for now is the ID which is the identifier that will allow us to access and change the widget manually from our window.py file.
As we are using Gtk.Template which basically let you inherit a widget in your class while keeping the widgets, their attributes and how they should behave defined in the UI file.
from gi.repository import Gtk

@Gtk.Template(resource_path='/com/belmoussaoui/Todo/window.ui')
class TodoWindow(Gtk.ApplicationWindow):
    __gtype_name__ = 'TodoWindow'

    label = Gtk.Template.Child()

    def __init__(self, **kwargs):
        super().__init__(**kwargs)
If we look closely to the content of the window.py we can see that we are setting the Template resource_path using a Gtk.Template as a decorator. We need also to set a __gtype_name__ to define the name the composite widget we are going to use from the UI file.

For every child of our TodoWindow widget that we would like to have access to, all we need to do is to add a new property to our class, the name of the property must be the ID we have given to the widget and it should be a Gtk.Template.Child.
The reason why we would like to access to the todo_list widget is we will be reading the different tasks from a database and we would like to fill the todo list from that.
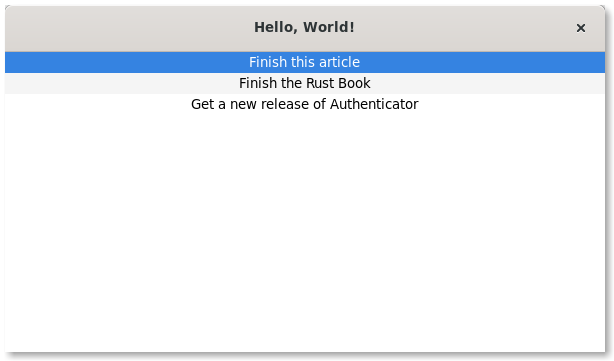
Let's add a bunch of random tasks manually to see how things look like. We are going to use a GtkLabel for now and update that later to use a widget that we are going to create ourselves.
from gi.repository import Gtk

@Gtk.Template(resource_path='/com/belmoussaoui/Todo/window.ui')
class TodoWindow(Gtk.ApplicationWindow):
    __gtype_name__ = 'TodoWindow'

    todo_list = Gtk.Template.Child()

    def __init__(self, **kwargs):
        super().__init__(**kwargs)
        self.__fill_todo_list()

    def __fill_todo_list(self):
        tasks = ["Finish this article",
                    "Finish the Rust Book",
                    "Get a new release of Authenticator"]
        for todo_item in tasks:
            todo_label = Gtk.Label(todo_item)
            todo_label.show()
            self.todo_list.add(todo_label)
Conclusion
When I started learning GTK a few years ago, you had to deal with installing the required dependencies, learn what' a build system and how to use one (we didn't even have Meson :/). Things got easier for newcomers, as you have seen on this first tutorial you can just start a new project and start hacking. Thank you, Builder, Flatpak, Meson, GTK and the maintainers of python-gobject for implementing GtkTemplate support. In the next tutorial, we will see how to create a widget that represents a task and how to store/read the tasks from a database. Till then here's a list of useful documentation to learn from:
-
PyGObject API Reference https://lazka.github.io/pgi-docs/
-
The Python GTK+ 3 Tutorial https://python-gtk-3-tutorial.readthedocs.io/en/latest/index.html
-
Tutorial for beginners (Python) https://developer.gnome.org/documentation/tutorials/beginners/getting_started.html
-
Flatpak Documentation http://docs.flatpak.org/en/latest/
-
Meson Documentation https://mesonbuild.com/