How to Flatpak a Rust application
Distributing and packaging your Rust GUI application and making it available for Linux users can be hard, I will try to explain the various ways of doing that using Flatpak as a packaging format.
I will be using a GTK + Rust application as an example to distribute it as a Flatpak in two different ways.
-
The first one, involves adding a build system, on top of Cargo to handle installing the different files we will need to ensure our application can be found, installed and used by the users. We will be using Meson
-
The second one, will just use Cargo and install those files manually during the Flatpak build
Creating a simple application
Let’s start with creating a simple Rust project by typing
cargo new rust-flatpak
The first step would be adding our dependencies to Cargo.toml
[package]
name = "rust-flatpak"
version = "0.1.0"
authors = ["Bilal Elmoussaoui <bil.elmoussaoui@gmail.com>"]
edition = "2018"

# See more keys and their definitions at https://doc.rust-lang.org/cargo/reference/manifest.html

[dependencies]
gtk = "0.8"
gio = "0.8"
and create a simple window, the code is from https://github.com/gtk-rs/examples/. You can check that repository if you need more examples.
use gio::prelude::*;
use gtk::prelude::*;
use std::env::args;
fn build_ui(application: &gtk::Application) {
let window = gtk::ApplicationWindow::new(application);
window.set_title("First GTK+ Program");
window.set_border_width(10);
window.set_position(gtk::WindowPosition::Center);
window.set_default_size(350, 70);
let button = gtk::Button::new_with_label("Click me!");
window.add(&button);
window.show_all();
}
fn main() {
let application =
gtk::Application::new(Some("com.belmoussaoui.RustFlatpak"), Default::default())
.expect("Initialization failed...");
application.connect_activate(|app| {
build_ui(app);
});
application.run(&args().collect::<Vec<_>>());
}
One important thing about how we create our a gtk::Application is the Application identifier we pass to it. If you don’t have an idea what an application id is, this guide should be complete https://developer.gnome.org/ChooseApplicationID/. Once we have finished building our application, the next step would be the packaging and distribution of what we just created.
We will need to prepare few files before doing so:
-
A metainfo, which is a a file that describes your application for stores like Flathub, GNOME Software, KDE Discover or elementary’s AppCenter. The specifications of this file can be found at https://www.freedesktop.org/software/appstream/docs/.
-
A desktop file, which is the launcher of the application that the user finds on their app launcher thing/dashboard. It specifies the app name, the binary that should be executed, an icon name and probably other stuff likes categories/keywords. You can read more about that here https://specifications.freedesktop.org/desktop-entry-spec/latest/
-
An icon, to make your app easier to find 🙂
Packaging related files
Metainfo file
Metainfo file, should include as much information about the application that allows the user to find it easily. You should provide some decent screenshots of the application, release tags and OARS tag. Providing a URL to your website or where to translate/report issues/donate could be added too.
The specs contains enough information about that, but here’s an example of such file, it should be named following $app-id.metainfo.xml and installed under $prefix/$datadir/metainfo.
<?xml version="1.0" encoding="UTF-8"?>
<!-- Bilal Elmoussaoui 2020 <bilal.elmoussaoui@gnome.org> -->
<component type="desktop-application">
  <id>com.belmoussaoui.RustFlatpak</id>
  <metadata_license>CC0</metadata_license>
  <project_license>GPL-3.0+</project_license>
  <name>Rust Flatpak</name>
  <summary>Rust Flatpak-ed app?</summary>
  <description>
    <p>This metainfo is part of a Rust Flatpak-ed application</p>
  </description>
  <screenshots>
    <screenshot type="default">
      <image>https://gitlab.gnome.org/World/design/contrast/raw/master/data/resources/screenshots/screenshot1.png</image>
      <caption>Main Window</caption>
    </screenshot>
  </screenshots>
  <url type="homepage">https://belmoussaoui.com/</url>
<!--
Open Age Rating Service
https://hughsie.github.io/oars/index.html
-->
  <content_rating type="oars-1.0" />
  <releases>
    <release version="0.0.1" date="2020-02-08">
      <description>
        <p>First release of Rust Flatpak App</p>
      </description>
    </release>
  </releases>
  <kudos>
    <!--
    GNOME Software kudos:
    https://gitlab.gnome.org/GNOME/gnome-software/blob/master/doc/kudos.md
    -->
    <kudo>ModernToolkit</kudo>
    <kudo>HiDpiIcon</kudo>
  </kudos>
  <developer_name>Bilal Elmoussaoui</developer_name>
  <update_contact>bilal.elmoussaoui@gnome.org</update_contact>

  <launchable type="desktop-id">com.belmoussaoui.RustFlatpak.desktop</launchable>
</component>
Desktop file
A desktop file is a simple launcher for the application, it shouldn’t contain more than. The file should be named com.belmoussaoui.RustFlatpak.desktop, if you look at the bottom of the metainfo file, we link the desktop file to it using the launchable tag. This allows the software center to figure out how to start your application.
The file should be installed under $prefix/$datadir/applications
[Desktop Entry]
Name=Rust Flatpak
Comment=Rust Flapaked application
Type=Application
# should be the same as the Cargo project name
Exec=rust-flatpak
Terminal=false
Categories=Utility;GTK;
Keywords=Rust;Flatpak;GTK;
Icon=com.belmoussaoui.RustFlatpak
StartupNotify=true
Icon
The application should provide an icon, either in various sizes or as a scalable SVG version. Most stores uses either 64px or 128px icons, but the application icon might be used at smaller sizes like 48px somewhere else.
The icon should be installed under $prefix/$datadir/icons/hicolor/scalable/apps/ in case you’re shipping an SVG icon. Otherwise it should be installed under $prefix/$datadir/icons/hicolor/48x48/apps/, the default available sizes are: 16, 32, 48, 64, 128, 256
Flatpak!
Using Meson Build System
The usage of Meson might seem not very useful if you’re not used to the GNOME Stack, but it provides a ton of features in a human readable way of writing things. It makes it pretty easy to use gettext for translating the desktop & metainfo files for examples, installing the icons at right place and so on. Features that Cargo can’t provide, at least, not in a simple way.
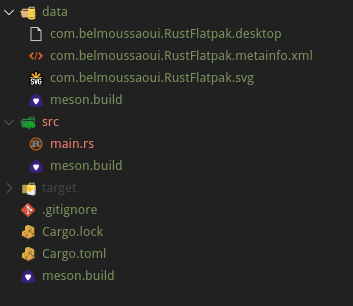
First step would be adding a meson.build files at the the same level as our main Cargo.toml in case your application is built split into different workspaces.
project('rust-flatpak',
        'rust',
        version: '0.1.0')
We started by defining our dependencies here, it might seems repetitive to have that here even if we do specify that in Cargo.toml, but it’s different. GTK is a a C library, and GTK Rust bindings just links to the library while providing a nice Rust wrapper around the C one. So you can’t build the application if those libraries can’t be detected by Cargo. Meson allows you to check that they are actually available before starting the build.
dependency('glib-2.0')
dependency('gio-2.0')
dependency('gtk+-3.0')
Let’s create a data directory and put our desktop, metainfo files and icons on it. You can name it differently, it’s just a convention.
We need to tell Meson to check the build receipt we will have in src and data
subdir('data')
subdir('src')
Let’s start by telling Meson how to install the files under data
datadir = get_option('prefix') / get_option('datadir')

application_id = 'com.belmoussaoui.RustFlatpak'
# Read more <https://mesonbuild.com/Reference-manual.html#install_data>

install_data(
    '@0@.desktop'.format(application_id),
    install_dir: datadir / 'applications'
)

install_data(
    '@0@.metainfo.xml'.format(application_id),
    install_dir: datadir / 'metainfo'
)

install_data(
    '@0@.svg'.format(application_id),
    install_dir: datadir / 'icons' / 'hicolor' / 'scalable' / 'apps'
)
You can notice that we are using get_option to get the prefix and datadir which could be defined at build time by passing --prefix=/usr --datadir=share.
Now, to the most complicated part of this, making Cargo & Meson happy friends. We can easily call Cargo from Meson and build our application, but we would like to define $CARGO_HOME during build, so we won’t have to re-download everything every time we rebuild the Flatpak. Sadly, ninja, “the build backend” used by Meson doesn’t support setting an env variable for a custom target. Until that’s fixed in both, we need to call a bash script from Meson that does call Cargo for us.
sources = [
    'main.rs',
]

cargo_script = find_program(join_paths(meson.source_root(), 'build-aux/cargo.sh'))
cargo_release = custom_target(
  'cargo-build',
  build_by_default: true,
  input: sources,
  output: meson.project_name(),
  console: true,
  install: true,
  install_dir: get_option('bindir'),
  command: [
    cargo_script,
    meson.build_root(),
    meson.source_root(),
    '@OUTPUT@',
    get_option('buildtype'),
    meson.project_name(),
  ]
)
And by convention I put the script to call under build-aux/cargo.sh
The content of the file should be
#!/bin/sh

export MESON_BUILD_ROOT="$1"
export MESON_SOURCE_ROOT="$2"
export CARGO_TARGET_DIR="$MESON_BUILD_ROOT"/target
export CARGO_HOME="$CARGO_TARGET_DIR"/cargo-home
export OUTPUT="$3"
export BUILDTYPE="$4"
export APP_BIN="$5"


if [[ $BUILDTYPE = "release" ]]
then
    echo "RELEASE MODE"
    cargo build --manifest-path \
        "$MESON_SOURCE_ROOT"/Cargo.toml --release && \
        cp "$CARGO_TARGET_DIR"/release/"$APP_BIN" "$OUTPUT"
else
    echo "DEBUG MODE"
    cargo build --manifest-path \
        "$MESON_SOURCE_ROOT"/Cargo.toml --verbose && \
        cp "$CARGO_TARGET_DIR"/debug/"$APP_BIN" "$OUTPUT"
fi
We should have everything by now, and the latest step would be preparing our Flatpak manifest.
We can try that our Meson build is working by typing
meson _builddir --prefix=/tmp
ninja -C _builddir
Before we start writing our Flatpak manifest, please take a short tour at https://docs.flatpak.org/en/latest/ to read about the basics of Flatpak.
We will be writing our manifest in JSON, you could use a YAML file too.
Flatpak Manifest
{
    "app-id": "com.belmoussaoui.RustFlatpak",
    "runtime": "org.freedesktop.Platform",
    "runtime-version": "20.08",
    "sdk": "org.freedesktop.Sdk",
    "sdk-extensions" : [
        "org.freedesktop.Sdk.Extension.rust-stable"
    ],
    "command": "rust-flatpak",
    "finish-args": [
        "--share=ipc",
        "--socket=fallback-x11",
        "--socket=wayland",
        "--device=dri"
    ],
    "build-options": {
        "append-path" : "/usr/lib/sdk/rust-stable/bin",
        "build-args" : [
            "--share=network"
        ],
        "env" : {
            "CARGO_HOME" : "/run/build/rust-flatpak/cargo"
        }
    },
    "modules": [
        {
            "name": "rust-flatpak",
            "buildsystem": "meson",
            "sources": [
                {
                    "type": "dir",
                    "path": "../"
                }
            ]
        }
    ]
}
Building our application using Flatpak isn’t hard, as the freedesktop runtime gives us already all what we could need to build our app, on top of it we have the Rust SDK extension that adds Rust support.
You can notice that the application is built with network access from the build-args. Flatpak by default, downloads all the sources and don’t give network access to anything during the build process. Except we need Cargo to be able to download our dependencies. Such manifest is the way to go if you’re using it for CI. If your plan is to use it to distribute your application on a Flatpak based store like Flathub, all the dependencies have to be downloaded before starting the build.
Meson allows you to create a tarball of your application using ninja -C _builddir dist. Except, we have to tell Meson that we need to bundle all our Cargo dependencies too, basically calling cargo vendor and moving the tarballs to $DIST.
meson.add_dist_script(
  'build-aux/dist-vendor.sh',
  meson.build_root() / 'meson-dist' / meson.project_name() + '-' + version,
  meson.source_root()
)
And we add our dist-vendor script
#!/bin/sh
export DIST="$1"
export SOURCE_ROOT="$2"

cd "$SOURCE_ROOT"
mkdir "$DIST"/.cargo
cargo vendor | sed 's/^directory = ".*"/directory = "vendor"/g' > $DIST/.cargo/config
# Move vendor into dist tarball directory
mv vendor "$DIST"
If we want to create a new release and publish it on Falthub, all we have to do is generate a tarball and upload it to our tagged release on Gitlab/Github/somewhere.
meson -C _builddir
ninja -C _builddir/ dist
Which should create a tarball under _builddir/meson-dist/. We can now remove the network access from build-argsand replace our source from a git type to an archive one and we should be ready to publish it on Flathub for a review!
Using flatpak-cargo-generator
Flatpak cargo generator is one of the many community made scripts that allows you to generate a Flatpak manifest of all the dependencies of your application for various programming languages.
The scripts takes your Cargo.lock as an input and generates a manifest that Flatpak can understand from it. Which could work perfectly fine in case you’re using Meson too (you just won’t have to create a dist script for bundling Cargo dependencies).
You can just grab the flatpak-cargo-generator script from https://github.com/flatpak/flatpak-builder-tools/blob/master/cargo/flatpak-cargo-generator.py and run it with
python3 ./flatpak-cargo-generator.py ./Cargo.lock -o cargo-sources.json
The script depends on the python module siphash
{
    "app-id": "com.belmoussaoui.RustFlatpak",
    "runtime": "org.freedesktop.Platform",
    "runtime-version": "20.08",
    "sdk": "org.freedesktop.Sdk",
    "sdk-extensions" : [
        "org.freedesktop.Sdk.Extension.rust-stable"
    ],
    "command": "rust-flatpak",
    "finish-args": [
        "--share=ipc",
        "--socket=fallback-x11",
        "--socket=wayland",
        "--device=dri"
    ],
    "build-options": {
        "append-path" : "/usr/lib/sdk/rust-stable/bin",
        "env" : {
            "CARGO_HOME" : "/run/build/rust-flatpak/cargo"
        }
    },
    "modules": [
        {
            "name": "rust-flatpak",
            "buildsystem": "simple",
            "build-commands": [
                "cargo --offline fetch --manifest-path Cargo.toml --verbose",
                "cargo --offline build --release --verbose",
                "install -Dm755 ./target/debug/rust-flatpak -t /app/bin/",
                "install -Dm644 ./data/${FLATPAK_ID}.metainfo.xml -t /app/share/metainfo/",
                "install -Dm644 ./data/${FLATPAK_ID}.desktop -t /app/share/applications/",
                "install -Dm644 ./data/${FLATPAK_ID}.svg -t /app/share/icons/hicolor/scalable/apps/"
            ],
            "sources": [
                {
                    "type": "dir",
                    "path": "../"
                },
                "generated-sources.json"
            ]
        }
    ]
}
Where the generated-sources.json is a the generated file using flatpak-cargo-generator
Trying your Flatpak manifest
You can build and test the Flatpak package locally using flatpak-builder
flatpak-builder --install repo build-aux/com.belmoussaoui.RustFlatpak.json --force-clean --user -y
You can run the application later using
flatpak run com.belmoussaoui.RustFlatpak
Publishing the application later on Flathub should be straight forward. You can read more about that from here
Bonus: Gitlab CI/Github Actions bundles
At GNOME we have a CI template that makes integrating a Flatpak pipeline pretty easy. It requires using Meson as a build system, but you can easily tweak that to your build preferences. Sadly, we can’t achieve similar results easily with Github Actions for now.
include:
  - project: 'gnome/citemplates'
    file: 'flatpak/flatpak-ci-initiative-sdk-extensions.yml'

flatpak:
  image: 'registry.gitlab.gnome.org/gnome/gnome-runtime-images/rust_bundle:3.38'
  variables:
    BUNDLE: "rust-flatpak-nightly.flatpak"
    MANIFEST_PATH: "build-aux/com.belmoussaoui.RustFlatpak.json"
    FLATPAK_MODULE: "rust-flatpak"
    APP_ID: "com.belmoussaoui.RustFlatpak"
    RUNTIME_REPO: "https://flathub.org/repo/flathub.flatpakrepo"
  extends: '.flatpak'
If you're using Github , you can use the flatpak-github-actions. See below for an example
on:
  push:
    branches: [master]
  pull_request:
name: CI
jobs:
  flatpak-builder:
    name: "Flatpak Builder"
    runs-on: ubuntu-latest
    container:
      image: bilelmoussaoui/flatpak-github-actions:gnome-3.38
      options: --privileged
    steps:
    - uses: actions/checkout@v2
    - uses: bilelmoussaoui/flatpak-github-actions@v1
      with:
        bundle: "rust-flatpak-nightly.flatpak"
        manifest-path: "build-aux/com.belmoussaoui.RustFlatpak.json"
That should be it 🙂 You should have the basics to publish a simple Rust application as a Flatpak. Useful links:
-
Flatpak Docs: https://docs.flatpak.org/en/latest/
-
Flatpak Builder Tools: https://github.com/flatpak/flatpak-builder-tools
-
Meson: https://mesonbuild.com/
-
Flathub publishing guides: https://github.com/flathub/flathub/wiki/App-Submission
-
GTK Rust bindings: https://gtk-rs.org/
-
GTK + Rust + Meson + Flatpak template: https://gitlab.gnome.org/bilelmoussaoui/gtk-rust-template